


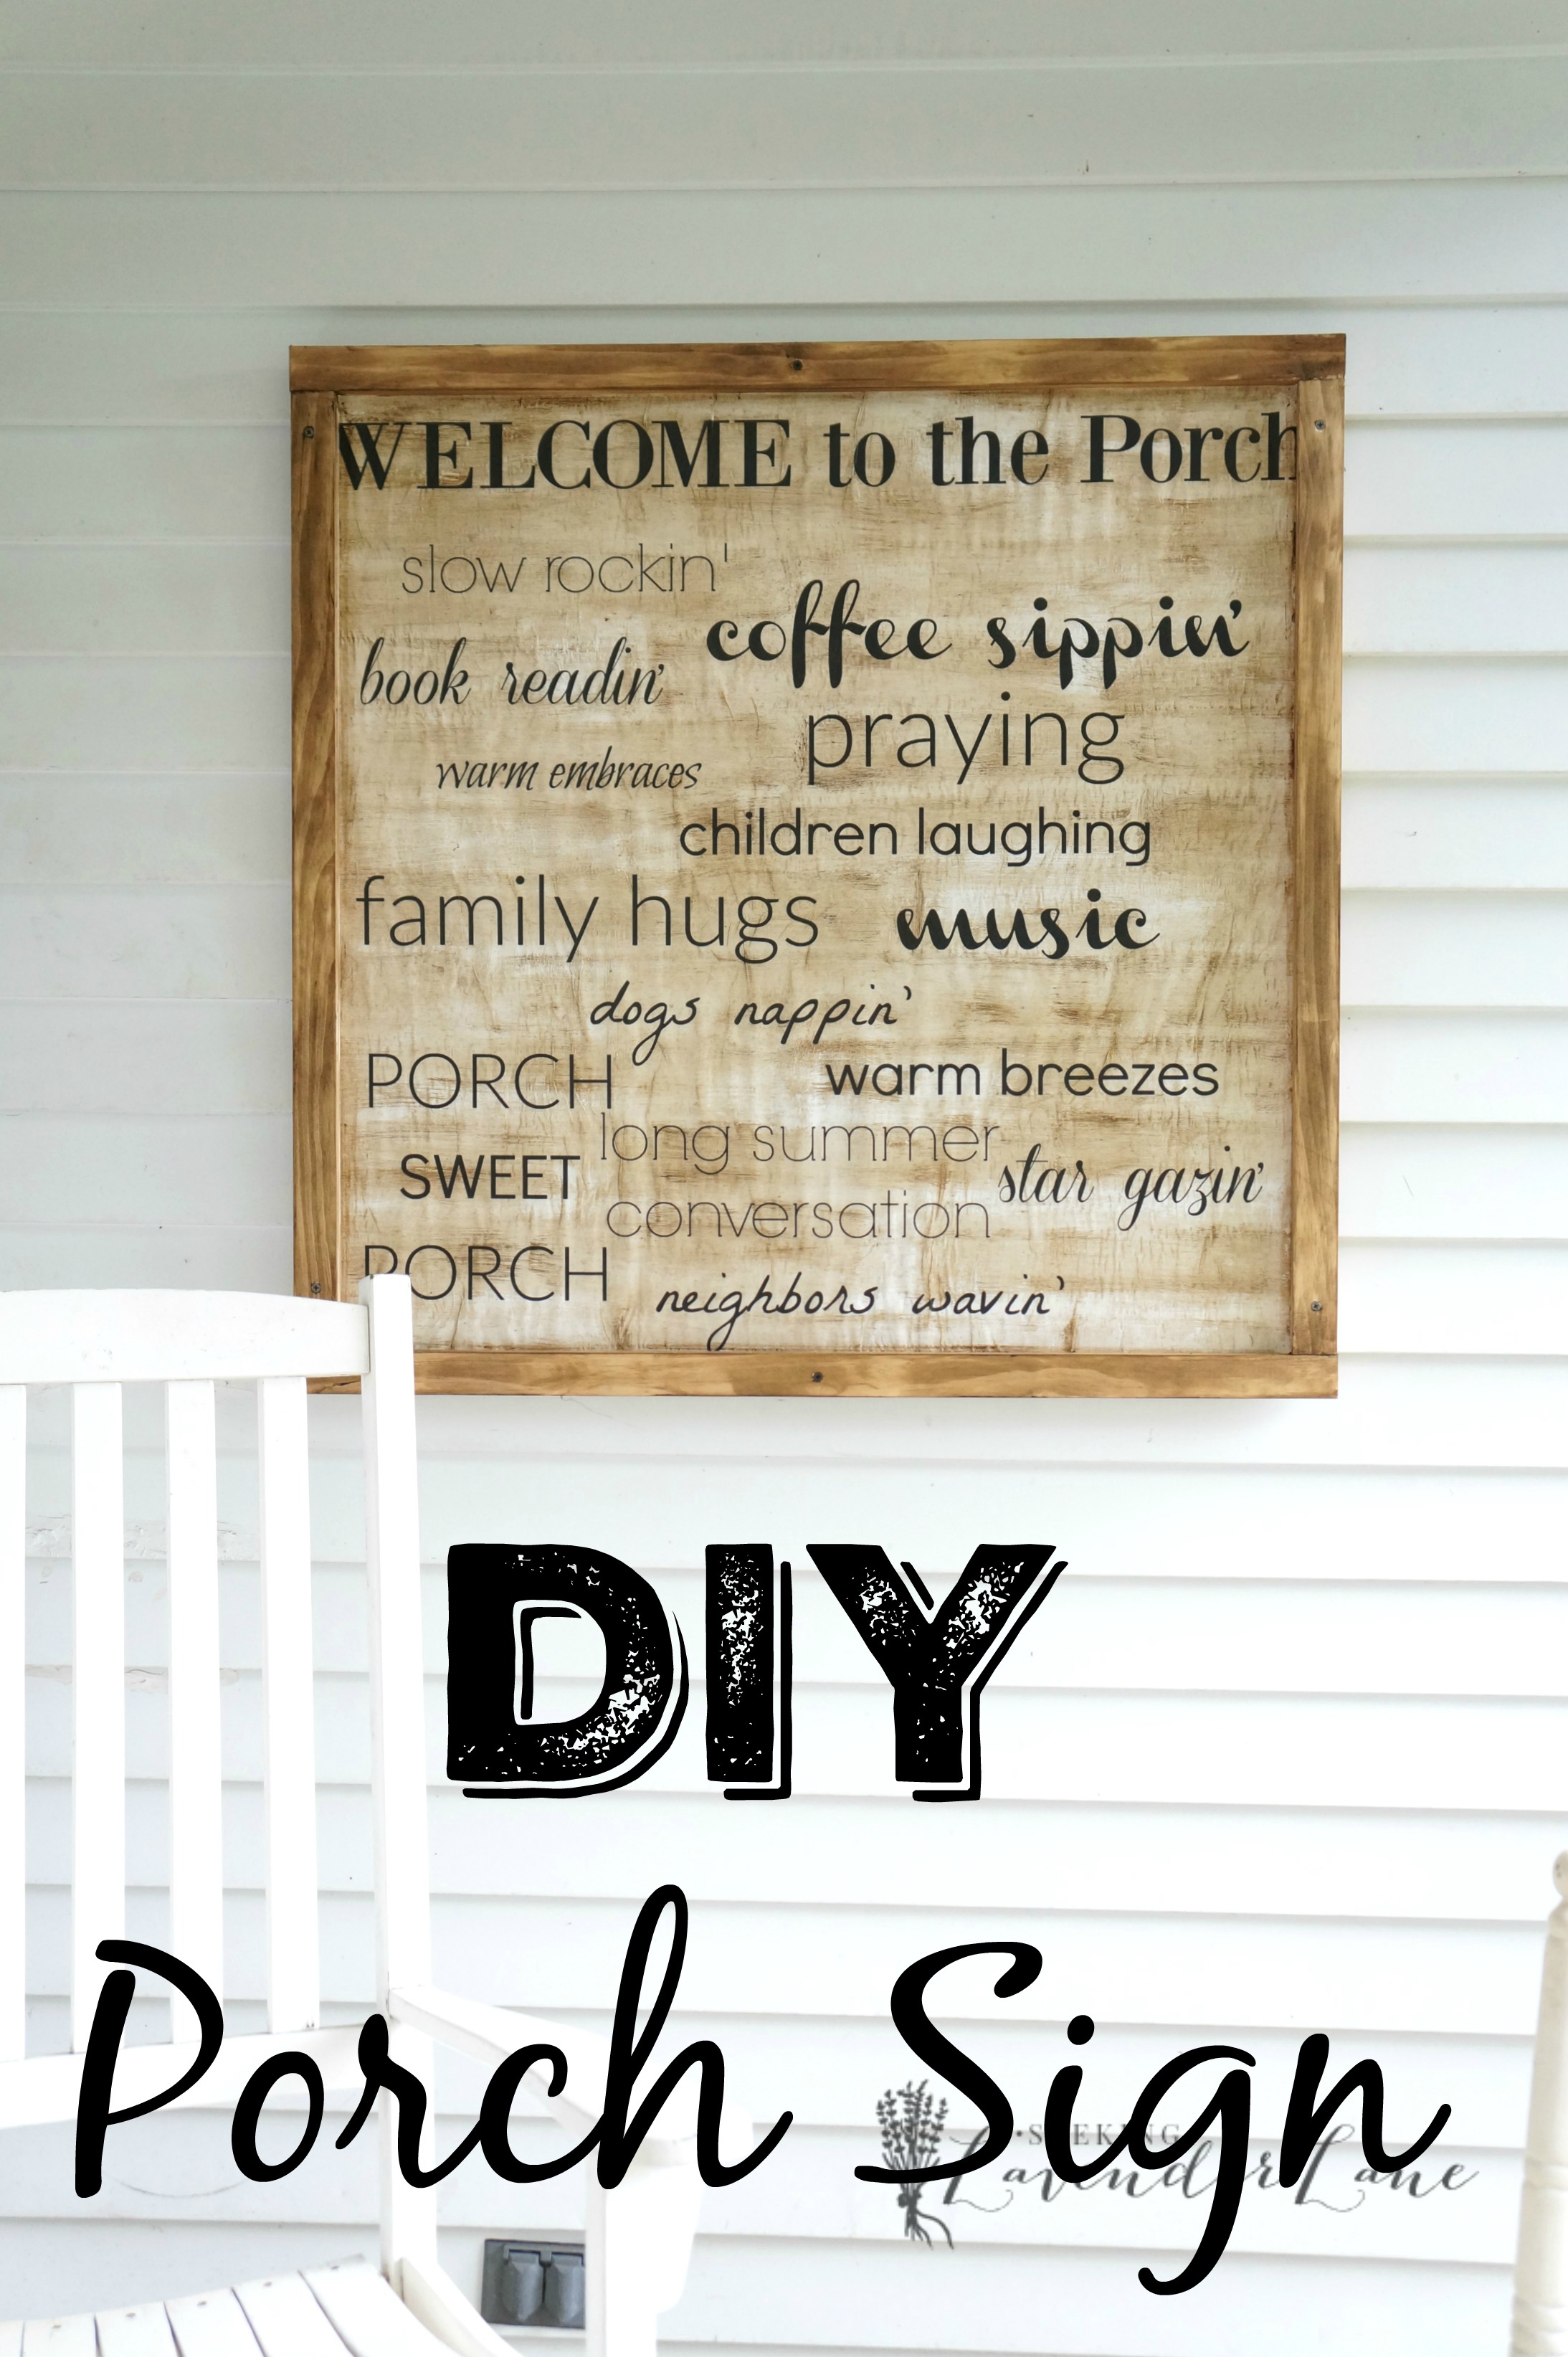
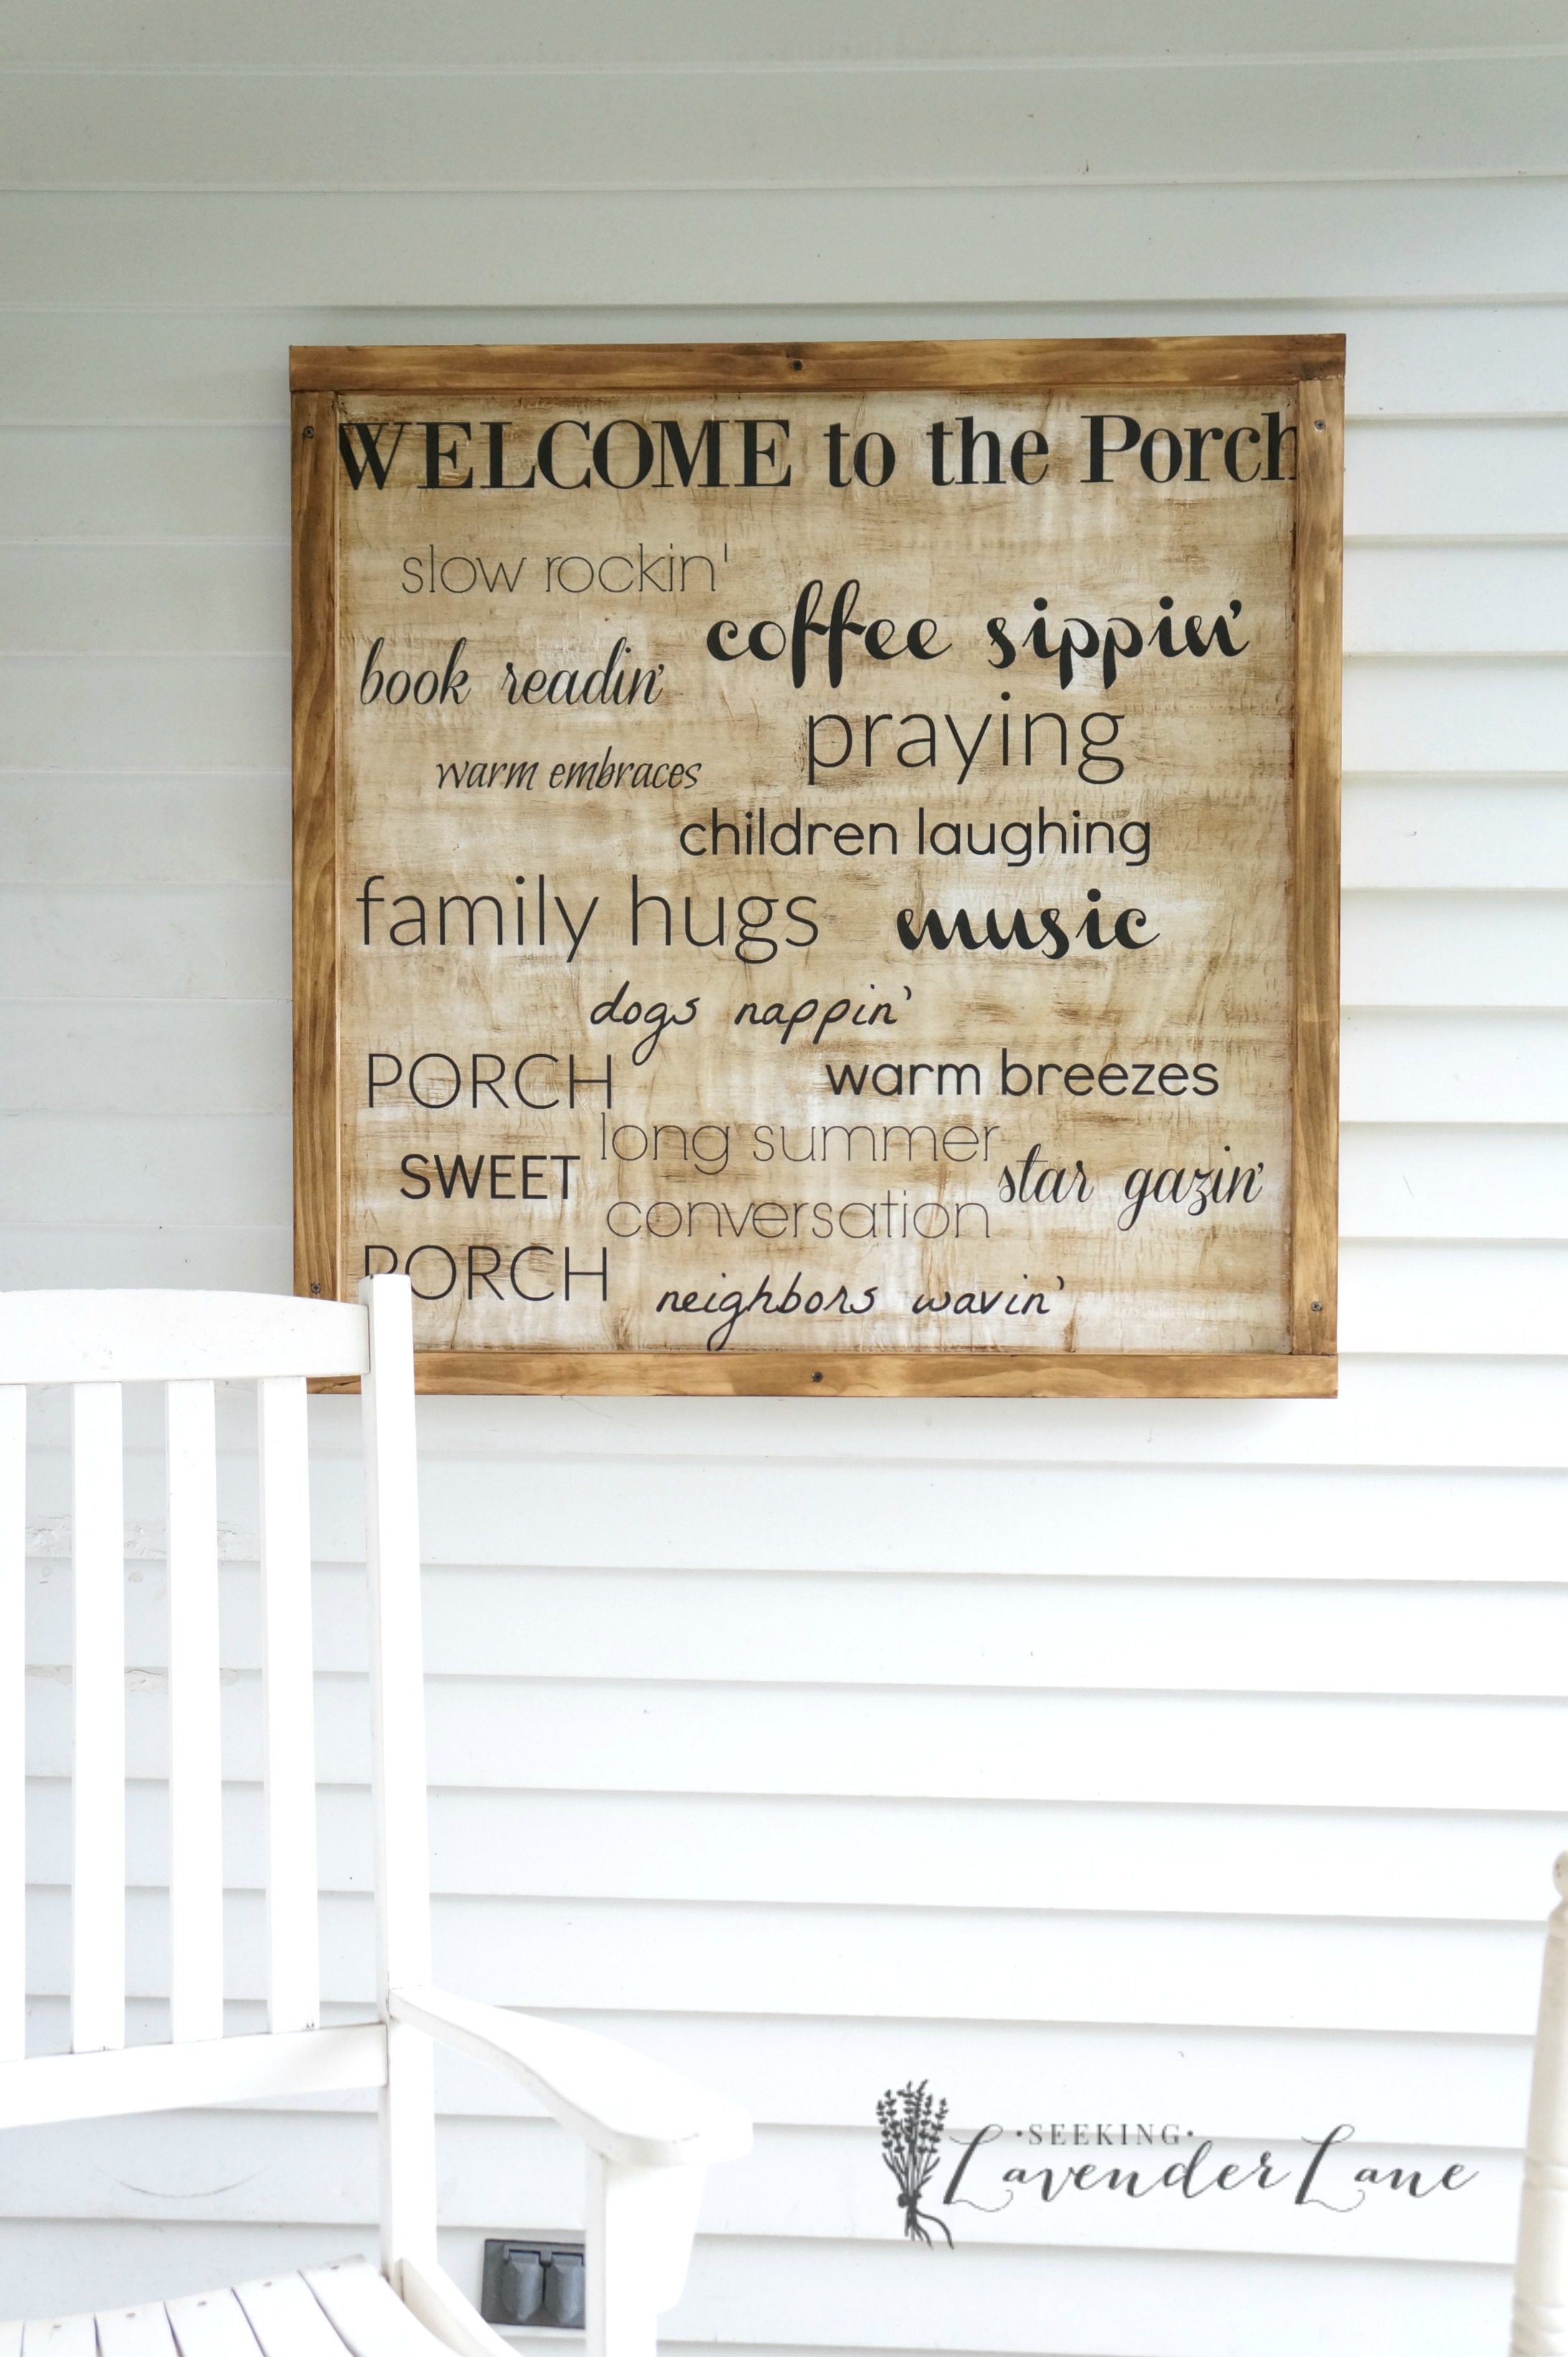
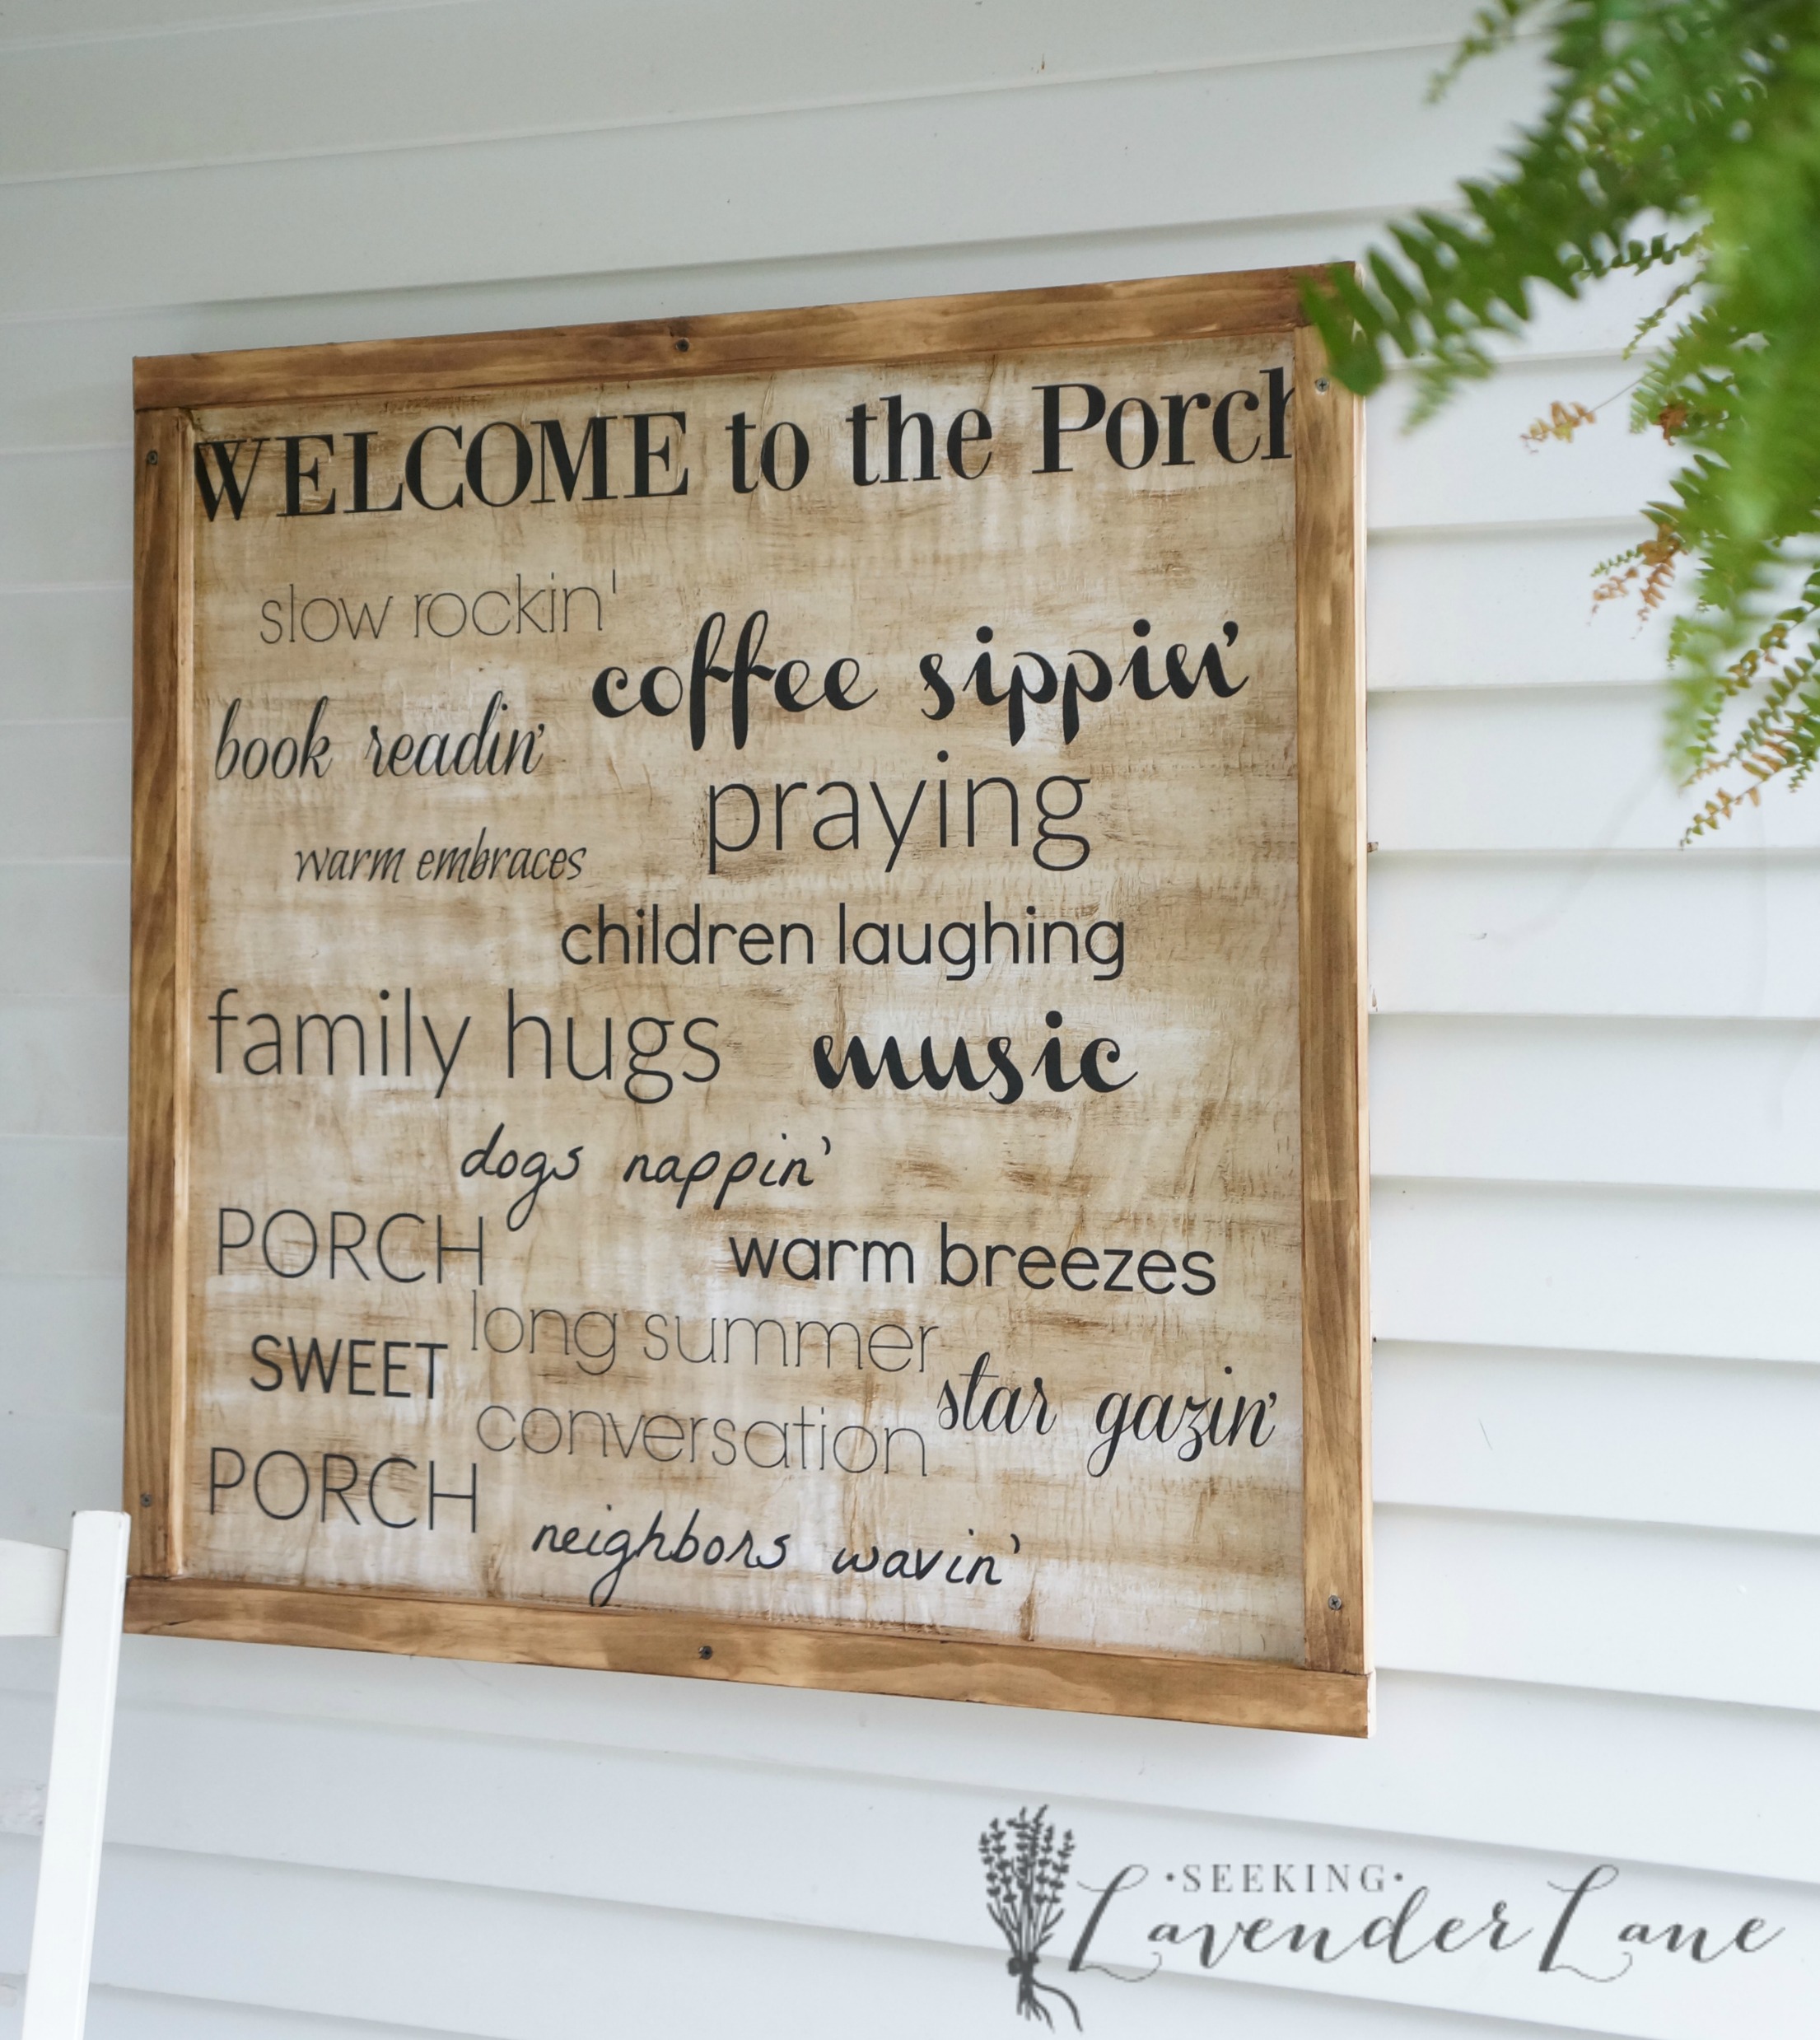
Cheap home decor with a rustic wooden sign:
Happy Tuesday after a long Memorial weekend. Ahh who’s dreading it? I’m grateful to be home, but gosh it’s for sure hard to see my hubby have to leave for work again and sending my son off on the school bus. Just love spending time together as a family! I work every weekend, so to have this long extended weekend off and be able to spend a lot of time together just makes me so happy, but then again hard to only have a small dose. Anyhow back to routine and back to kicking my butt into this Curb Appeal Blog Hop! This week we start sharing our progress, and I tell ya I did not get very far. I thought even with having some time this weekend with the hub we would knock out a big project or two, but turns out we cleaned the garage instead-boo!!! So here’s one I did get to before the weekend hit and I just love the charm and presence it brings to my porch. This post contains affiliate links for your convenience. A great way to add some decorative touches is with a rustic wooden sign. I created a DIY porch wooden sign that definitely becomes a focal point.
Well, let’s walk you through the steps here…
So, I can’t take full credit on this one! I stopped by my friend Lauren’s page from Blesser House, where she shares a really easy tutorial on how she made this indoor sign. I love signs, but gosh I just hold back from purchasing since sometimes they can be a little pricey. I’ve always wanted to know how to make my own but figured I just did not have the right equipment. So when I saw that Lauren printed hers out from Staples and used Mod Podge to create this…I knew I had to give it a try. I thought this had to be easier than stenciling.
Materials
print out from Staples (3’x3′)
Wood (cut to the desired size) 1/4″ thick plywood
wood for the frame
stain/dark wax (annie sloan)

Step 1:
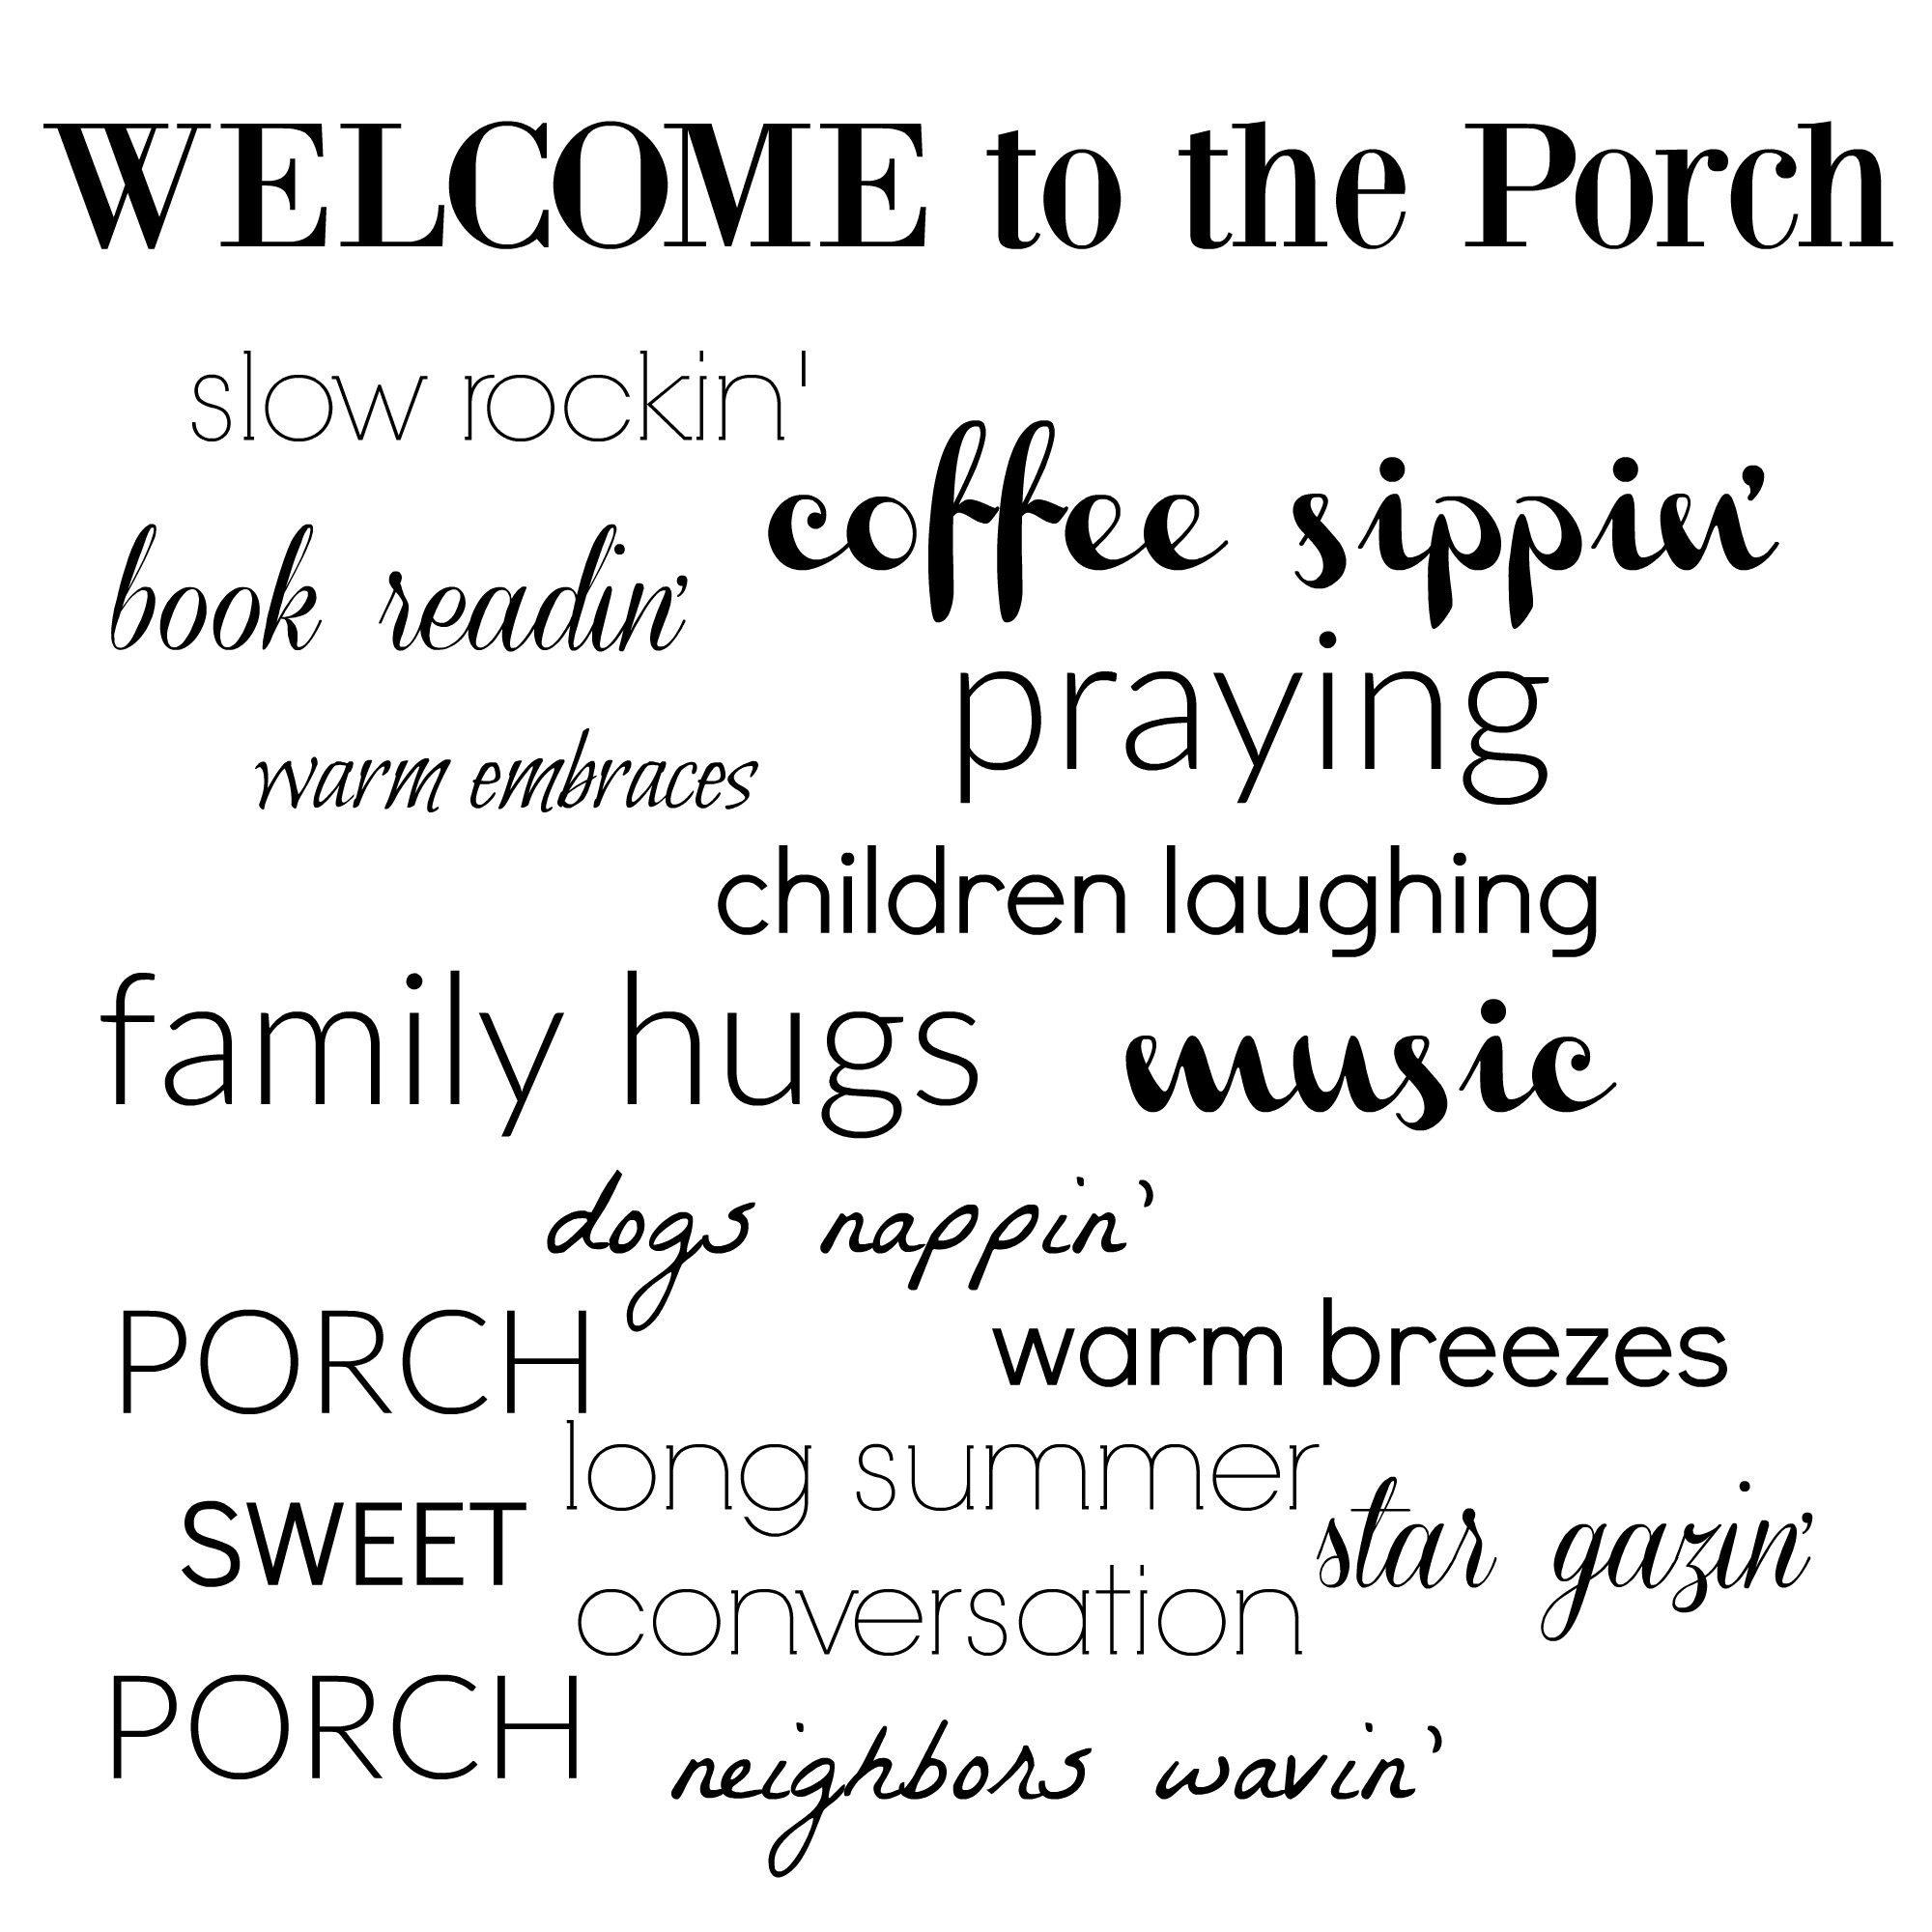
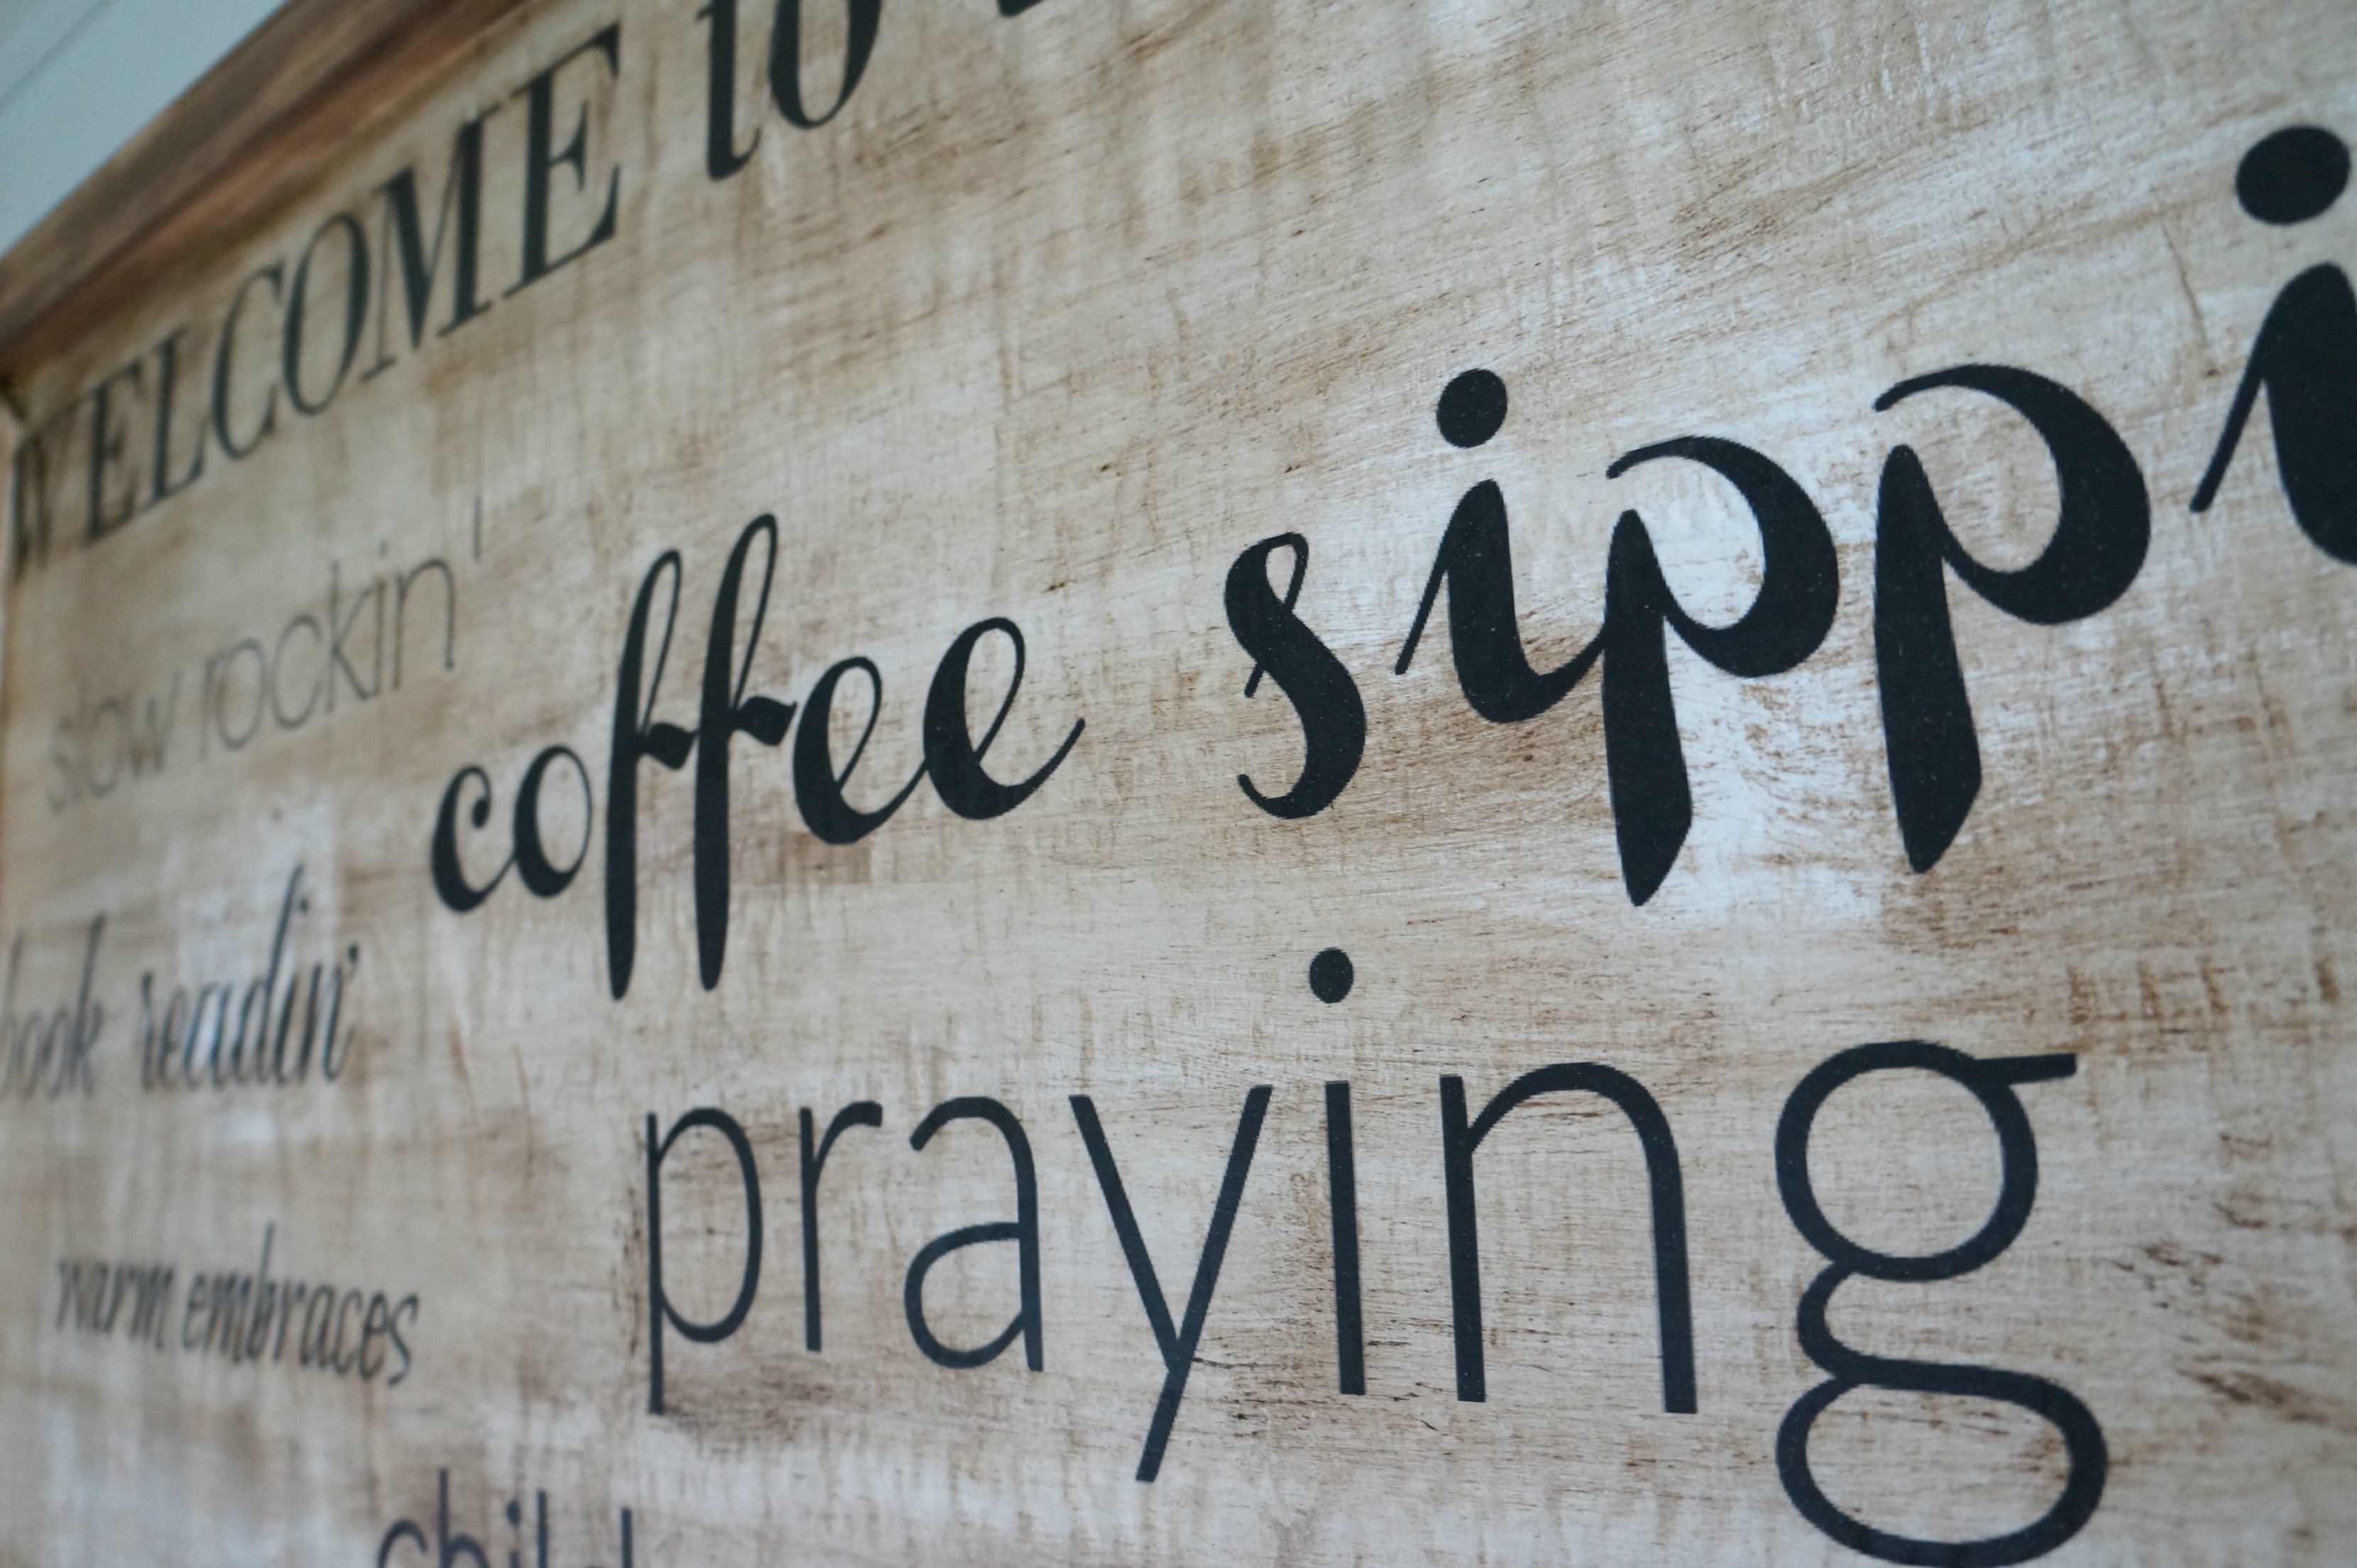
I created my own words using Picmonkey for a great sign print out.
Step 2:
I stopped over at Staples, where I had the ladies print out my sign on a custom size sheet 3’x3′
Step 3:
I then ran over to Lowes where they cut a 3’x3′ size board for me, and I picked up some wood for trim. (I realized afterward that going slightly bigger on the wood, would have worked best).
Step 4:
This is where you get your Mod Podge out and apply in small sections to the wood to apply the paper. This was the first time I have ever used Mod Podge, even though I had a bottle on hand I had yet to ever use it. Be patient and take your time, this can be a bit of sticky situation…and bubbles and creases are really hard to get out.
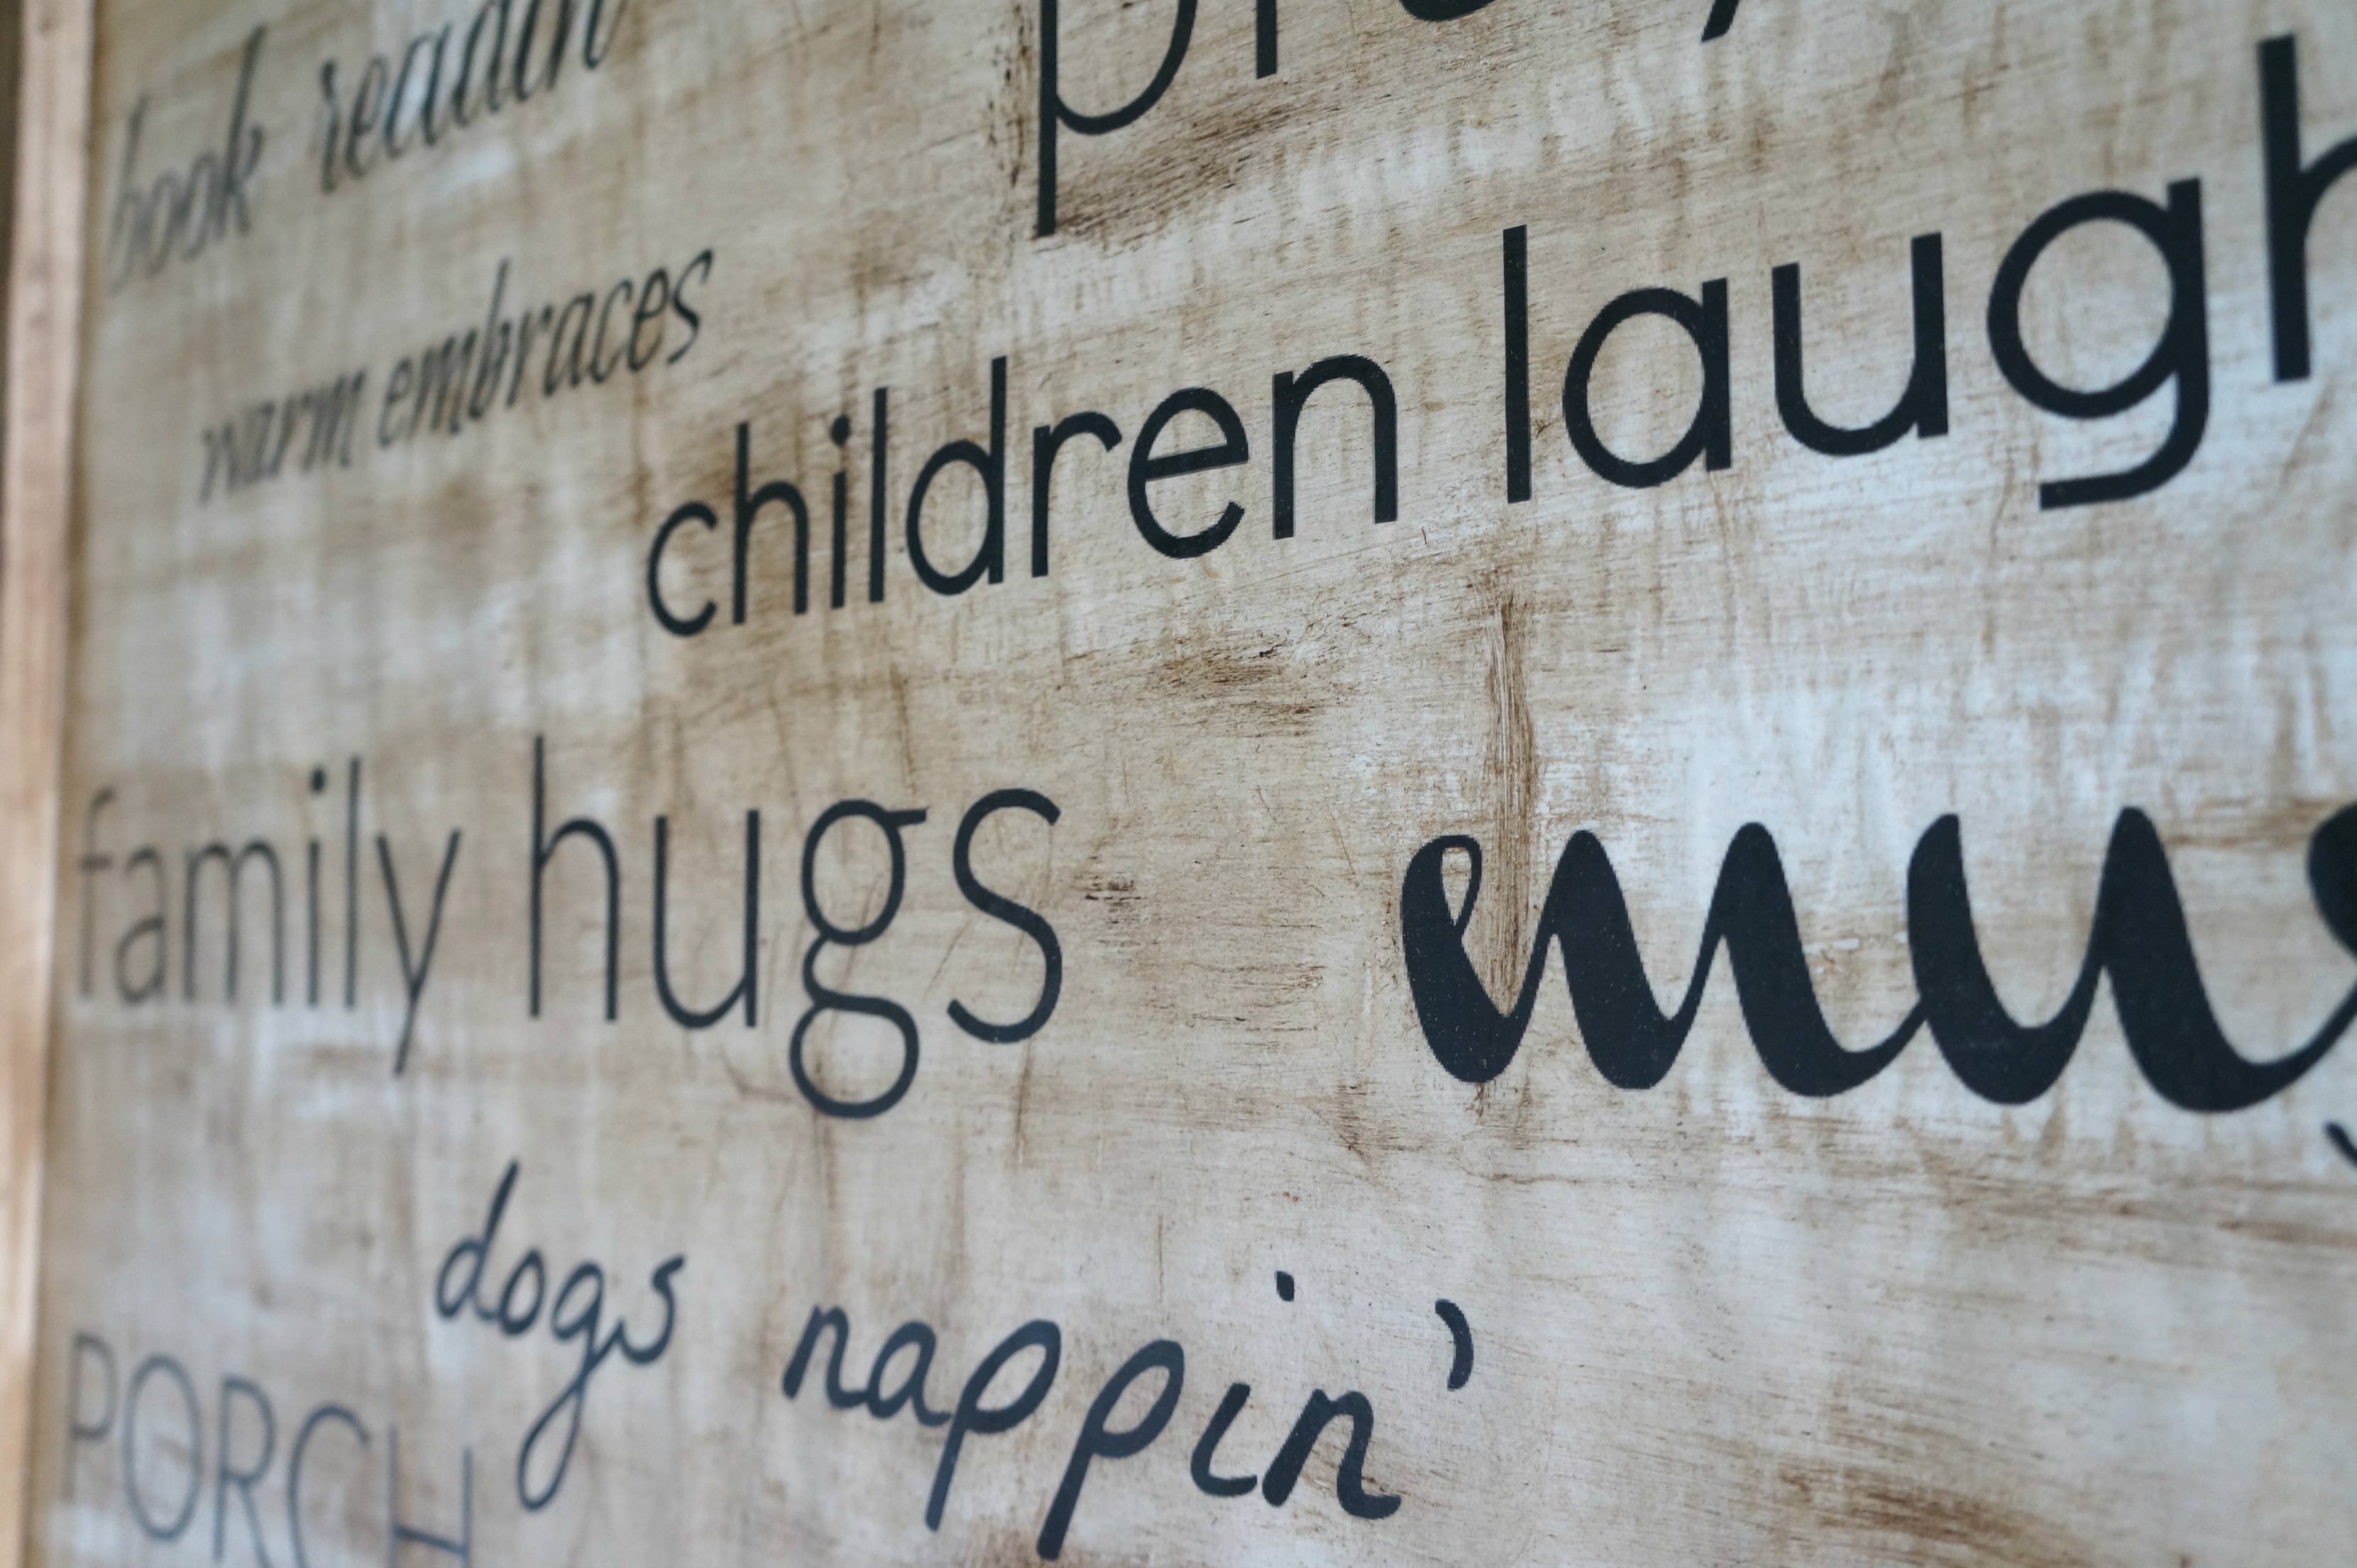
Step 5: Embrace the creases and add Dark Wax for more of a distressed look (my Plan B)
I decided to really add some “vintage” flair to this wooden sign…the creases were harder to get out than I had hoped and when I realized I had to work with them…I figured adding dark wax and embracing the wrinkles was going to work in my favor. I then added some mod podge over some areas of the wax which resulted in taking some of the wax off, I love how it gave more of a “distressed” look. My goal was to truly try to achieve a rustic wooden sign look to the paper as much as I could.
Step 6: Add Frame and stain or use dark wax as I had.
P.S. I thought I had photos of these steps, and somehow I guess I totally skipped taking photos.
So a few tips:
See how my frame overlapped the top words a bit, use a larger size piece of wood to avoid this from happening.
Embrace the wrinkles if you are going for a more “distressed” look, if not take your time and be sure to use a medium amount of mod podge when working on pasting the paper. If you have dry areas in the paper this will only create bubbles adding more creases than desired.
Also, don’t use this method if you have an area that will get wet. I am fortunate that where this is hung under my porch really won’t have any direct access to rain or sprinklers.
3 Weeks to go until the Reveal, last week I shared my plans for the space. I know we are going to have to skip some of the projects I would like to get to since we just found out our roof will need replacing. We will see how it goes. I’ll keep you filled in. For now making the most out of what we are doing to the exterior space.
Stop by my friend’s page’s and see what progress they have made on their Curb Appeal Blog Hop
Create a Farmhouse Porch

PLEASE STAY A WHILE
Outdated Patio Set Rustic Makeover


33 Responses
It looks amazing! I love it. How precious!
Amy @ My Life From Home recently posted…Curb Appeal Challenge 2016 Front Porch Refresh & Lighting: Week #2
Thanks Amy!
Love this!!! I think this is perfect for the front porch!
Emily recently posted…Curb Appeal Challenge, adding the flowers
Thank you so much Emily!
Such a fun DIY, Deb! Perfect for your porch!
Thanks Heather!
I love your custom sign! So cute and sweet!
Lauren recently posted…Shade Container Gardens {Curb Appeal Blog Hop – Week 2}
Thank you so much Lauren!
Love the sign, its a great tutorial! its going to look so stylish outside! I love the way the you used the different fonts for each word! Beautiful job! Maria
Maria Brittis recently posted…DREAM.CREATE.INSPIRE.LINK{50}
Thanks Maria!
The sign looks great! At first I thought you painted it and then I read your post. Very clever!!!!!! It perfect on your porch. I love it
Have a great week
-Jenny
Jenny Kavanagh recently posted…Pinwheel Bouquet Tutorial & Curb Appeal Challenge
Thanks so much Jenny!
Love it Deb, definitely my favorite porch sign yet! Embracing the wrinkles really gave it that vintage/distressed look and adds so much character. Pinning to share.
Marie, The Interior Frugalista recently posted…What A Difference White Paint Makes To Refresh Candleholders!
Such an awesome sign Deb!!! I want to try something similar for inside my house now. Pinning 🙂
Tara @ Lehman lane recently posted…Dream. Create. Inspire. Link Party #49
By any chance do you have the file of this porch sign saved and you could share with us? It would take me forever to get the right fonts and sizes and placements of each word. Is is possible you can post a link to it that we could download? Or some other way? I have a nephew with a new house and this would be an awesome gift for their front porch.
Hi Barb, I sent you an email back with the file, let me know if you receive it. If not I can send it out to you again!
Would you mind sending me the file as well! Everything about your sign is perfect! Thanks in advance!
Hi Yvonne, sure do you want to send me your email address so I can send that to you?
My email is yv77@aol.com. Thank you so much!!!
Hi there, I would REALLY love the file for this sign as well!!! Ahhhh can’t wait to make one!! Will you please send it to me!? hschween@gmail.com. You also mentioned that you used thicker paper the second time. What kind of paper is that, or what should I ask for it to be printed on? Thank you!!
Hi Heidi,
I wish I could be exact, but I know the last time I went the girl offered me a second kind of printing paper that she said was a little thicker and so I figured I would try it. I thought it was easier to work, with less bubbles. I’ll send over the file now!
What kind of paper is this printed out on?
It’s from staples it’s a large printer paper. I just recently made another one and used slightly thicker and it actually worked out even better.
I just discovered your blog and subscribed. I love what I see so far. I have a quick question and it might be one that most people wouldn’t have to ask, but I’m not as hip as I should be technology-wise. So I just decided I would ask you and see if you can help me figure it out. I understood your tutorial the only thing I did not understand about the tutorial about your rustic porch sign is how you get Staples to print it out for you. What I mean is what is it that I bring them to print out? Is it Something I print out from my email or something I hand them, I’m not really sure I understand. I know this might sound kind of dumb but if you could just help me understand how I get the information from myself to them, it would be very helpful. I’ve been out of the loop technology-wise I’m not sure how to do that part of it. Thank you so much and I apologize for my ignorance.
Hi Katherine,
No problem at all! So you’re going to save the file to an external hard drive and then bring that with you to Staples. The team at Staples should be able to print that off of the file and in a large size. Hope this helps, if not feel free to email me!
Hello, once you created your sign in PicMonkey, what program did you use to send it to staples so that when they Enlarged it it wasn’t blurry??
Correct, you have them print it out I usually tell them to make sure it does not print blurry. Every time I’ve got to print one so far it has been a different printer or different explanation so I just make sure not to leave until it looks perfect lol.
Hi I really like this, Can you me the File aswell. Thank you
absolutely!
WOuld you send me the file too?
and how did you have Staples print it? did you do it online? on regular paper they printed it? can you explain a little more.
thanks
Love the porch sign! Would you mind to send me the link to the design? My email is sheath@utk.edu
Thank you so much for sharing ~ can’t wait to do this project!
Hello, I love your porch sign! Excited to give it a try! Do you mind sharing your file? Thanks so much!!!
Thanks so much Cathy!