

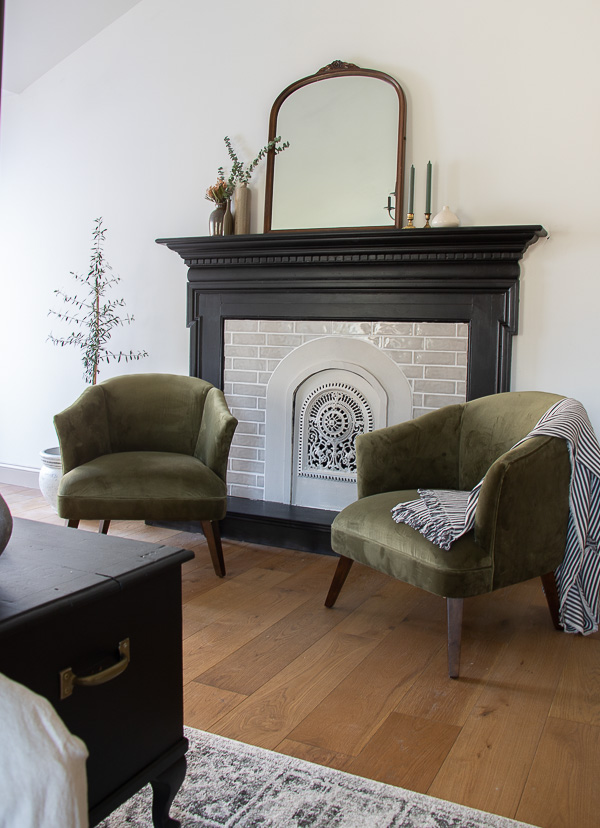

Well, behold the master bedroom faux mantel is officially ready to share. Week 4 of the ORC and I still have so much to do, but we are getting there! We installed our wallpaper tonight, received our bedding, and I’ve been starting to even add some final decorating touches to the parts of the room that are done.
Ok, lets talk about the mantel that gave me a run for my money. The piece that is a focal point of the room, and may have made me cry. It’s still not 100% done, I plan to add some molding at the bottom of the platform and also around the tile, but who can wait for that…I wanted to finally share how the mantle turned out.
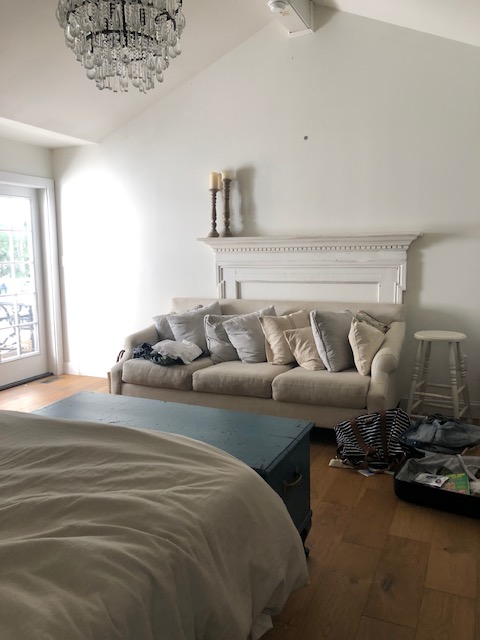
If you all remember how the mantel started…I’ll share the BEFORE once more.
Also to catch up on… Weeks 1, 2, 3 of the ORC!
Okay, it’s kind of hidden behind the sofa, but you get the idea of it. I got this mantel from a neighbor from our last house. She was so kind and had the best vintage decor and pieces. I knew I wanted to hang onto it, and when we had to scratch the gas fireplace from the plans in the master, I figured we would add the mantel to this wall for a dramatic feel. Well, we gave it quite the makeover.
Lots of confusion, compromises, and eventually a finished look that I am pretty happy with.
- Black paint
- A platform (to fix the awkwardness of the floating mantel)
- A vintage arched wrought iron piece for the mantel
- A DIY arched cut out
- Tile

We bought some particle board to create an arch for to go around this metal piece we got from flea market. I thought painting the entire piece black was the way to go…but it was awful! Onto the next plan… We bought some tile that was close in color to the trim color we used. Then painted the arch with Stone Hearth to match the trim in our room.
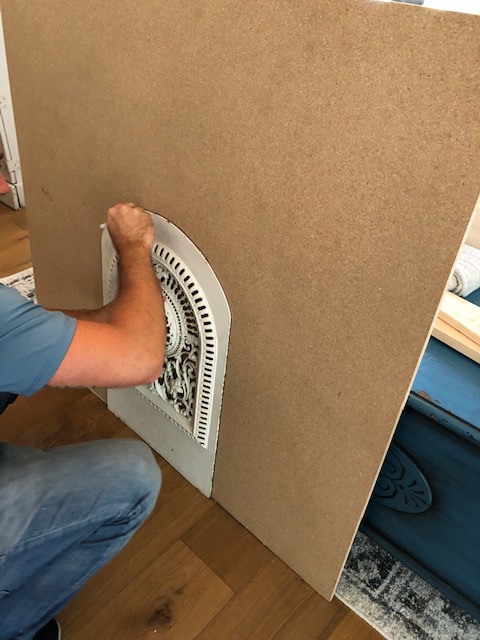
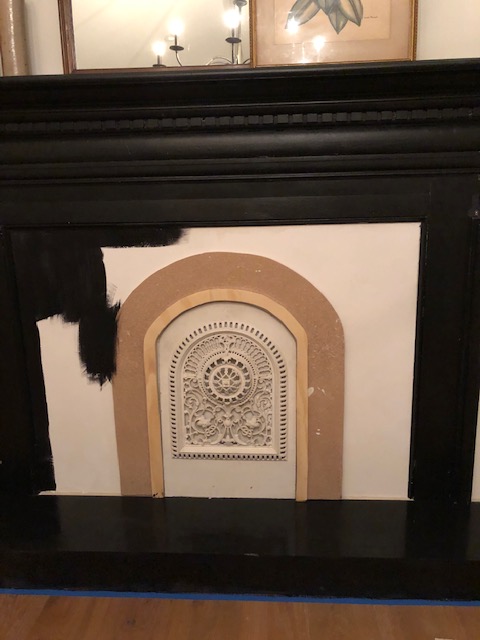
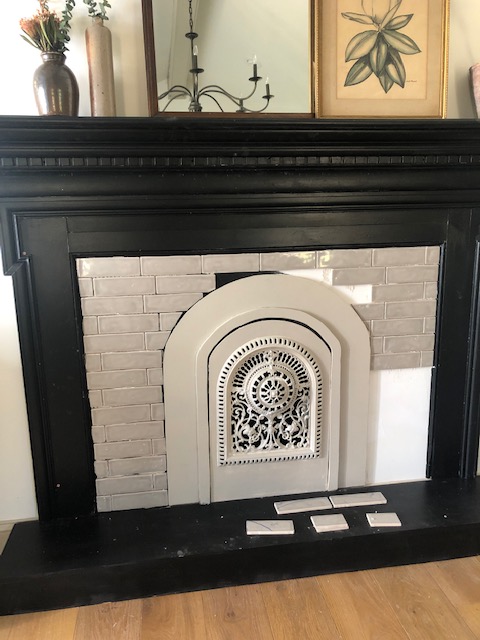
I’m not gonna lie I was pretty frustrated on this one. I thought about throwing in the towel so many times, but I kept at re-imaging how to make it all work. I think a few of the issues were, the size, the addition of the arch, and I really did not want the end result to look too DIYish if that makes sense. I was hoping it would look like a working fireplace or like an old fireplace that once existed.
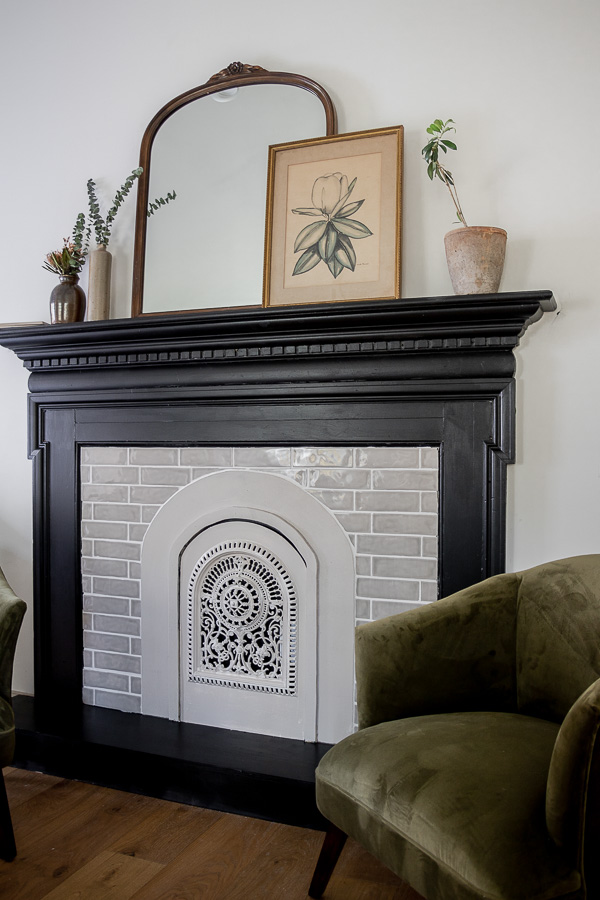
Here she is!!!!!!
The tiles we picked up at Lowes, they were a great price and I loved how they matched the color of our trim. At least they were pretty close in color. At one point I did not think we were going to do tile at all and I had an idea to fill in the space with molding. I’m not sure how that would have turned out, but we could’t find the right molding that I needed. So, we went back to the plan with using tiles. That’s how the entire process was…it was lets try this, no lets try this instead….until finally something worked.

- The green velvet chairs arrived this week (first look at their pretty-ness), but we still have a few more details to go, before we can call this room makeover complete.
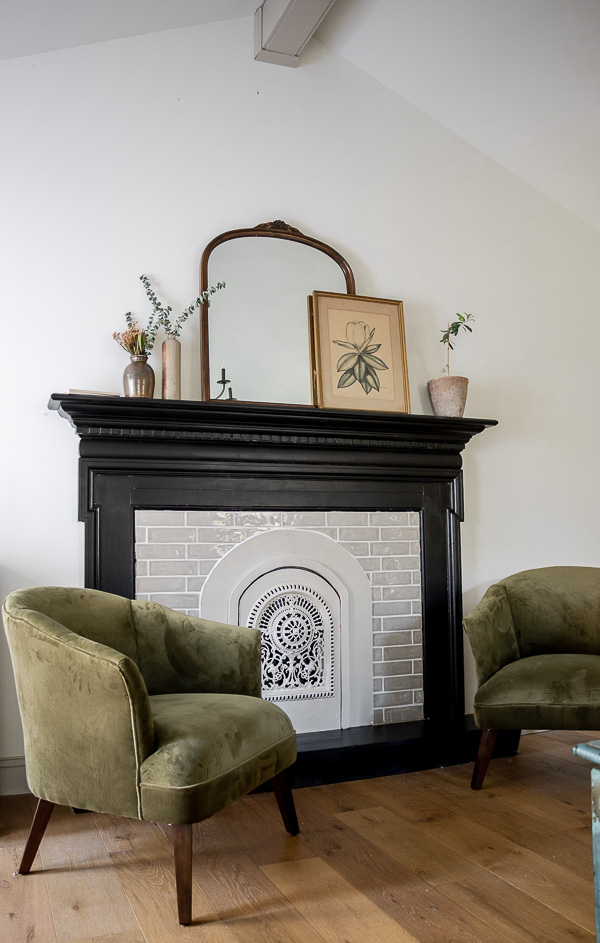
I should add that we also painted our beam in stone hearth this week too, which made such a difference. You can see a bit of it in this last picture.


34 Responses
Beeeutiful! Love the uniqueness of where the fireplace would be
thank you so much Julie!
Deb!! that looks beautiful. You pulled it off girl! Love the way it came out. It honestly looks like a working fireplace, just open the little door and throw in some wood. Perfection!
ahh thanks so much Lilly!
That looks awesome….luv how it turned out! Well done.
aw thanks Erika!
Amazing!! Better than I imagined …not that I had any clue what it was going to look like ! It’s simply stunning! Everything’s just perfect
Lol thanks so much Amy!
Wow , your so talented and such a visionary!! Awesome job , keep going strong !!
aw thank you so much Megan!
It turned out so nice! The tile was the perfect addition!
Thanks Andrea!
Is color Stone Hearth (beam in bedroom) is that a Benjamin Moore color?
Hey Kate! Yes, it is! It’s the color of all the trim we have been doing in our house.
I love it! You made all the right choices, ? I love the arch you found. It is the perfect finishing piece for your antique mantel.
Thank you so much Joanna
Very pretty!
Thank you Cynthia!
That is incredible! No resemblance to DIY or faux anywhere. LOVE IT!!!
ahhh thanks Sherry! That is the best comment : ) I so appreciate that xoxo
Beautiful! To me it looks like a classic Victorian fireplace! I’ve been wanting to do something like this and this is very encouraging!
Oh yay! Thank you so much Ericka!
I absolutely love how it turned out!! The tile with that antique insert is perfect here and the black mantle gives such a beautiful contrast! Those green velvet chairs are a gorgeous pop of color and texture next to it too! Great job Deb, I can’t wait to see the whole room!! ??✨??
Hi Deb!
What a unique and gorgeous statement fireplace! You’ve added so much character to your bedroom and the styling on the mantle is spot on! Who cares that it’s faux! Nailed it again my dear!
I Love it! The fireplace is a dream and the color green on the chairs is beautiful. What a beautiful setting.
Great job!! The fireplace looks like a real working fireplace. It’s absolutely gorgeous!
Absolutely stunning fireplace. It looks so real that you could fool anyone. It looks like a professional did it..not a DIY. The green chairs are perfect.. matching the picture on the mantle.
It really does look like a working fireplace! I love the colors you choose, and those fabulous chairs compliment it so well.
Well done!
Wow, it looks so great! I feel as though I could put my hands out and they would be warmed by the fire. You did a fantastic job!!
The transformation of your fireplace/mantle is amazing. Your final choices were the right ones – and that Victorian insert is like a jewel in the crown. Good job!!!
This mantel is stunning Deb! I know it was probably frustrating trying to work it out but gosh, it’s so pretty, I’m glad you stayed the course. I can’t wait to see everything else you have in store for this room. I know it’s going to be gorgeous. Hugs, CoCo
CoCo recently posted…Welcome Home Sunday
aw thank you so much Coco
Your faux fireplace looks great! I have that exact mantle (real fireplace) and have been thinking about painting it dark – I think I just may do that soon! It looks awesome like that!
As for your gorgeous green chairs – love love love that color – looks great around black too.
Well done, Deb.
Have a great week!
Thanks Michele! Amazing, def a good change to do a pop of black on a fireplace.